Appearance
聊天插件
VS Code 的 Copilot 聊天插件架构使插件作者可以集成 GitHub Copilot Chat。VS Code 的聊天插件通过 VS Code 插件的聊天 API,为用户提供一种 聊天的交互体验。
聊天参与者(与用户聊天的对方)是各种领域的专家,它可以回答用户提出的任何特定领域的问题,并且可以使用不同的方法处理用户的提问:
- 使用 AI 来理解用户的提问并生成回答。比如使用 VS Code 提供的 语言模型 API
- 将用户请求转发到服务端
- 使用程序和本地资源进行处理
聊天参与者可以通过多种方式使用语言模型。有的参与者只是使用语言模型来获得输入提示,例如 sample cat participant。更多的还是像 autonomous agents,借助语言模型来提供更多功能。一个很好的例子是内置的 @workspace,正如众所周知的那样,你的工作区可以回答你的问题。在 VS Code 的内部,@workspace 集成了多方的功能:GitHub 的知识图谱、结合语义搜索、本地代码索引、VS Code 的语言服务。
当用户在聊天中明确提到 @participant 参与者时,用户输入的内容会转发给提供该聊天参与者的插件。此参与者会使用 ResponseStream 来回复用户的请求。为了提供顺滑的用户体验,聊天 API 是基于流式传输实现的。一个 ResponseStream 包含:
- 使用 Markdown 文本来提供简单的文本和图片回复
- 使用按钮来调用 VS Code 的命令
- 使用进度来表示长任务的运行
- URI 或者是编辑器位置的引用
- 文件的树形结构(例如当聊天参与者想要创建一个新的工作区时,展示一个工作区的预览)
为了帮助用户进一步深入对话,参与者可以为每个回复提供后续问题(follow-ups)。这些后续问题会作为建议出现在聊天用户界面中,它们可能会给予用户关于聊天插件功能的灵感,引导他们探索更多可能性,或是深入了解某个话题。
聊天参与者同样可以提供 命令,这些命令通常是某些功能的缩写,并且以 / 符号开头。插件可以稍后可以将该命令提供给语言模型。举例来说,/explain 是 @workspace 提供者提供的命令,可以让某些语言模型来解释代码。
提示: 聊天 API 和 语言模型 API 在 VS Code 2024 年 7 月发布的稳定版中最终确定。我们建议你在
package.json中使用engines来指定你的插件所要求的 VS Code 的最低版本,最好是1.90.0版本及以上。VS Code 稳定版将在聊天 API 最终确定之前,优雅地处理已经使用了聊天 API 的插件。
通过 GitHub 应用扩展 GitHub Copilot
此标题换言之,也可以是通过创建一个 GitHub 应用程序来扩展 GitHub Copilot,该应用程序在聊天视图中为聊天参与者提供支持。GitHub 应用由其后台程序支持,可以用在所有 GitHub Copilot 应用中,例如 github.com、Visual Studio、VS Code。另一方面,GitHub 应用没有 VS Code API 的全部访问权限。要通过 GitHub 应用来扩展 GitHub Copilot,你需要加入 Copilot Partner Program。
开发的前置准备
要开发一个聊天插件,你需要确定:
- 使用 GitHub Copilot Chat 插件的预发布版本
参考链接
用户聊天体验
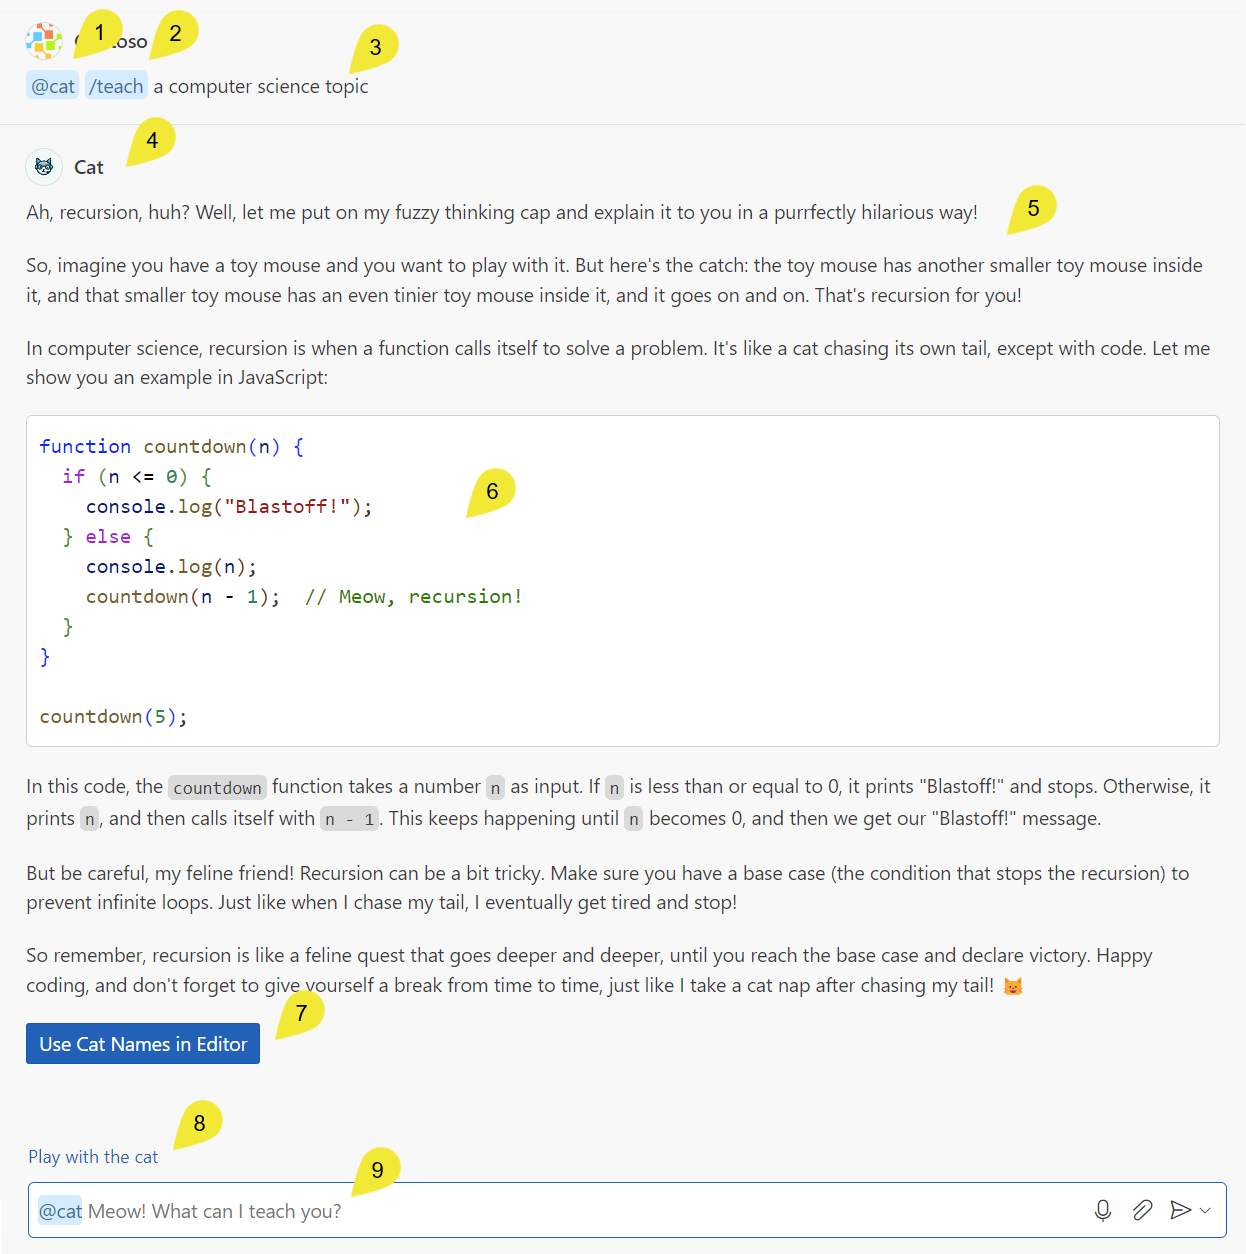
下面的图片中展示了 VS Code 的示例聊天插件中各式各样的概念。

- 使用
@唤出@cat聊天参与者
- 使用
/语法来唤出teach命令
- 用户提供的查询语句,也称作用户提示
- 参与者的名字和图标,表示 Copilot 正在使用
@cat聊天参与者
- Markdown 响应,由
@cat提供
- markdown 响应中的代码片段
- Button included in the
@catresponse, the button invokes a VS Code command - Suggested follow-up questions provided by the chat participant
- Chat input field with the placeholder text provided by the chat participant's
descriptionproperty
Develop a chat extension
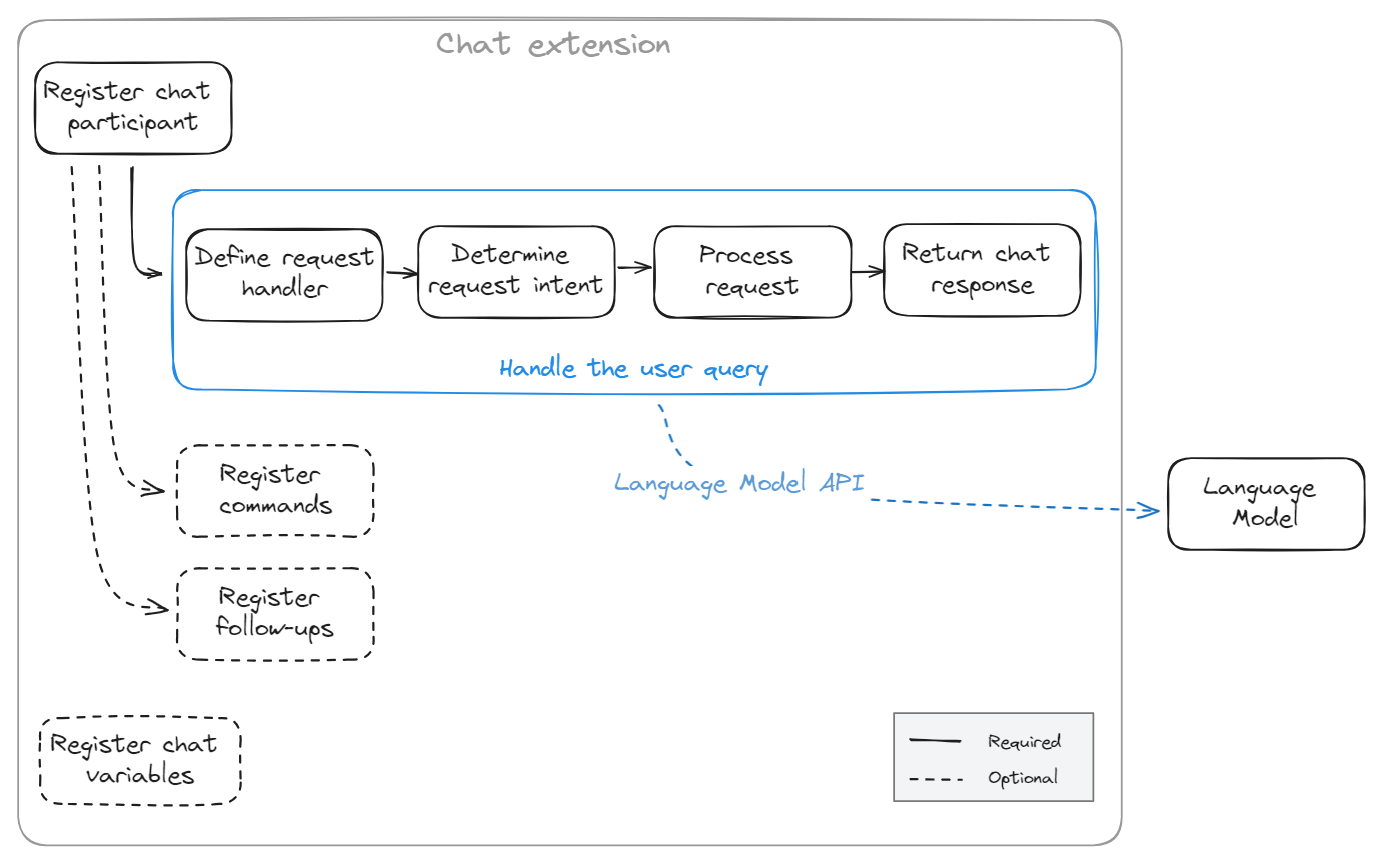
A chat extension is an extension that has a dependency on the Copilot Chat extension and contributes a chat participant. You can find details about how to define extensionDependencies in the extension manifest.
The minimum functionality that is needed for implementing a chat extension is:
- Register the chat participant, to let users invoke it by using the
@symbol in the VS Code Chat view. - Define a request handler that interprets the user's question, and returns a response in the Chat view.
You can further expand the functionality of the chat extension with the following optional features:
- Register chat commands to provide users with a shorthand notation for common questions
- Define suggested follow-up questions to help the user continue a conversation
- Define chat variables to capture and share domain-specific context in chat conversations
As a starting point for developing a chat extension, you can refer to our chat extension sample. This sample implements a simple cat tutor that can explain computer science topics using cat metaphors.

Register the chat extension
The first step to create a chat extension is to register it in your package.json by providing a unique id, the name, and description:
json
"contributes": {
        "chatParticipants": [
            {
                "id": "chat-sample.cat",
                "name": "cat",
                "fullName": "Cat",
                "description": "Meow! What can I teach you?",
                "isSticky": true
            }
        ]
}We suggest to use a lowercase name to align with existing chat participants. name can not contain spaces. Users can then reference the chat participant in the Chat view by using the @ symbol and the name you provided. We suggest to use title case for the fullName, which is shown in the title area of a response from your participant. Some participant names are reserved, and in case you use a reserved name VS Code will display the fully qualified name of your participant (including the extension id). The description is shown in the chat input field as a placeholder text.
The isSticky property controls whether the chat participant is persistent, which means that the participant name is automatically prepended in the chat input field after the user has started interacting with the participant.
Up-front registration of participants and commands in package.json is required, so that VS Code can activate your extension at the right time, and not before it is needed.
After registration, all your extension has to do is create the participant by using vscode.chat.createChatParticipant. When creating the participant, you have to provide the ID, which you defined in package.json, and a request handler.
The following code snippet shows how to create the @cat chat participant (after you register it in your package.json):
typescript
export function activate(context: vscode.ExtensionContext) {

    // Register the chat participant and its request handler
    const cat = vscode.chat.createChatParticipant('chat-sample.cat', handler);

    // Optionally, set some properties for @cat
    cat.iconPath = vscode.Uri.joinPath(context.extensionUri, 'cat.jpeg');

    // Add the chat request handler here
}After registering and creating the chat participant, you now need to implement the request handler to process a user's request.
Implement a request handler
The request handler is responsible for processing the user's chat requests in the VS Code Chat view. Each time a user enters a prompt in the chat input field, the chat request handler is invoked. These are the typical steps for implementing a chat request handler:
- Define the request handler
- Determine the intent of the user's request
- Perform logic to answer the user's question
- Return a response to the user
Define the request handler
You define the request handler (vscode.ChatRequestHandler) inside the extension's activate function.
The following code snippet shows how to define a request handler:
typescript
const handler: vscode.ChatRequestHandler = async (request: vscode.ChatRequest, context: vscode.ChatContext, stream: vscode.ChatResponseStream, token: vscode.CancellationToken): Promise<ICatChatResult> => {

    // Chat request handler implementation goes here

};Determine the request intent
To determine the intent of the user's request, you can reference the vscode.ChatRequest parameter to access the prompt, commands, chat location, and chat variables that the user entered in the Chat view. Optionally, you can take advantage of the language model to determine the user's intent, rather than using traditional logic. Learn how you can use the Language Model API in your extension.
The following code snippet shows the basic structure of first using the command, and then the user prompt to determine the user intent:
typescript
const handler: vscode.ChatRequestHandler = async (request: vscode.ChatRequest, context: vscode.ChatContext, stream: vscode.ChatResponseStream, token: vscode.CancellationToken): Promise<ICatChatResult> => {

    // Test for the `teach` command
    if (request.command == 'teach') {

        // Add logic here to handle the teaching scenario
        doTeaching(request.prompt, request.variables);

    } else {

        // Determine the user's intent
        const intent = determineUserIntent(request.prompt, request.variables);

        // Add logic here to handle other scenarios
    }
};Process the request
Next, you need to implement the actual logic for processing the user request. Often, chat extensions use the Language Model API to process the request. In this case, you might adjust the language model prompt to match the user's intent. Alternately, you can implement the extension logic by invoking a backend service, by using traditional programming logic, or by using a combination of all these options. For example, you could invoke a web search to gather additional information, which you then provide as context to the language model.
While processing the current request, you might want to refer to previous chat messages. For example, if a previous response returned a C# code snippet, the user's current request might be "give the code in Python". Learn how you can use the chat message history.
If you want to process a request differently based on the location of the chat input, you can use the location property of the vscode.ChatRequest. For example, if the user sends a request from the terminal inline chat, you might look up a shell command. Whereas, if the user uses the Chat view, you could return a more elaborate response.
Return the chat response
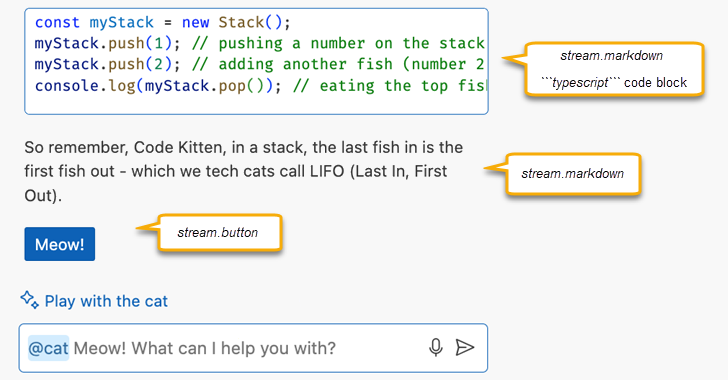
Once you've processed the request, you have to return a response to the user in the Chat view. Chat extensions can use streaming to respond to user queries. Responses can contain different content types: markdown, images, references, progress, buttons, and file trees. For example to generate this response:

An extension can use the response stream in the following way:
typescript
stream.progress('Picking the right topic to teach...');
stream.markdown(`\`\`\`typescript
const myStack = new Stack();
myStack.push(1); // pushing a number on the stack (or let's say, adding a fish to the stack)
myStack.push(2); // adding another fish (number 2)
console.log(myStack.pop()); // eating the top fish, will output: 2
\`\`\`
So remember, Code Kitten, in a stack, the last fish in is the first fish out - which we tech cats call LIFO (Last In, First Out).`);

stream.button({
    command: 'cat.meow',
    title: vscode.l10n.t('Meow!'),
    arguments: []
});In practice, extensions typically send a request to the language model. Once they get a response from the language model, they might further process it, and decide if they should stream anything back to the user. The VS Code Chat API is streaming-based, and is compatible with the streaming Language Model API. This allows extensions to report progress and results continuously with the goal of having a smooth user experience. Learn how you can use the Language Model API.
Use the chat message history
Participants have access to the message history of the current chat session. A participant can only access messages where it was mentioned. A history item is either a ChatRequestTurn or a ChatResponseTurn. For example, use the following code snippet to retrieve all the previous requests that the user sent to your participant in the current chat session:
typescript
const previousMessages = context.history.filter(h => h instanceof vscode.ChatRequestTurn);History will not be automatically included in the prompt, it is up to the participant to decide if it wants to add history as additional context when passing messages to the language model.
Register commands
A chat participant can contribute commands, which are shortcuts to specific functionality provided by the extension. Users can reference commands in chat by using the / syntax, for example /explain.
One of the tasks when answering questions is to determine the user intent. For example, VS Code could infer that Create a new workspace with Node.js Express Pug TypeScript means that you want a new project, but @workspace /new Node.js Express Pug TypeScript is more explicit, concise, and saves typing time. If you type / in the chat input field, VS Code offers a list of registered commands with their description.

Chat participants can contribute commands with their description by adding them in package.json:
typescript
"contributes": {
    "chatParticipants": [
        {
            "id": "chat-sample.cat",
            "name": "cat",
            "fullName": "Cat",
            "description": "Meow! What can I teach you?",
            "isSticky": true,
            "commands": [
                {
                    "name": "teach",
                    "description": "Pick at random a computer science concept then explain it in purfect way of a cat"
                },
                {
                    "name": "play",
                    "description": "Do whatever you want, you are a cat after all"
                }
            ]
        }
    ]
}Register follow-up requests
After each chat request, VS Code invokes follow-up providers to get suggested follow-up questions to show to the user. The user can then select the follow-up question, and immediately send it to the chat extension. Follow-up questions can provide inspiration to the user to take the conversation further, or to discover more capabilities of the chat extension.
The following code snippet shows how to register follow-up requests in a chat extension:
typescript
cat.followupProvider = {
    provideFollowups(result: ICatChatResult, context: vscode.ChatContext, token: vscode.CancellationToken) {
        if (result.metadata.command === 'teach') {
            return [{
                prompt: 'let us play',
                title: vscode.l10n.t('Play with the cat')
            } satisfies vscode.ChatFollowup];
        }
    }
};Tip: Follow-ups should be written as questions or directions, not just concise commands.
Variables
Note: The Variables API is still in a proposed state and we are actively working on it.
Chat extensions can also contribute chat variables, which provide context about the extension's domain. For example, a C++ extension might contribute a variable #cpp that would get resolved based on the state of the language service - what C++ version is being used and what C++ programming approach is preferred.
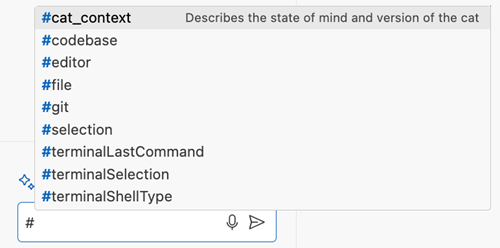
Users can refer to a chat variable in a prompt by using the # symbol. A variable is resolved by either the chat extension that contributed that variable, or by VS Code when it's a built-in variable (for example, #file or #selection). VS Code offers the list of registered variables upon typing the # symbol in the chat input.

Variables are resolved independently of the active chat participant. This means that you can use them as a mechanism to share context between different participants. For example, @workspace already maintains an index of the current workspace and contributes a variable #codebase. Users can include this variable in a prompt to pass the codebase context to another chat participant.
Variables and their values are passed as an object bag to the handler in request.variables. The prompt contains variable references as entered by the user and it is up to the participant to further modify the prompt, for instance by inlining variable values or creating links to headings which contain the resolved values. Variables are sorted in reverse order by their appearance in the prompt. That means that the last variable in the prompt is the first in this list. This simplifies string-manipulation of the prompt.
Variable resolvers can offer multiple length levels for the variable value. VS Code selects one based on how many tokens are left in a language model prompt.
typescript
vscode.chat.registerVariable('cat_context', 'Describes the state of mind and version of the cat', {
    resolve: (name, context, token) => {
        if (name == 'cat_context') {
            const mood = Math.random() > 0.5 ? 'happy' : 'grumpy';
            return [
                {
                    level: vscode.ChatVariableLevel.Short,
                    value: 'version 1.3 ' + mood
                },
                {
                    level: vscode.ChatVariableLevel.Medium,
                    value: 'I am a playful cat, version 1.3, and I am ' + mood
                },
                {
                    level: vscode.ChatVariableLevel.Full,
                    value: 'I am a playful cat, version 1.3, this version prefer to explain everything using mouse and tail metaphors. I am ' + mood
                }
            ]
        }
    }
});Guidelines
Chat participants should not be purely question-answering bots. When building a chat participant, be creative and use the existing VS Code API to create rich integrations in VS Code. Users also love rich and convenient interactions, such as buttons in your responses, menu items that bring users to your participant in chat. Think about real life scenarios where AI can help your users.
It doesn't make sense for every extension to contribute a chat participant. Having too many participants in chat might lead to a bad user experience. Chat participants are best when you want to control the full prompt, including instructions to the language model. Use chat variables when you only want to provide extra context to a prompt when requested by the user. You can reuse the carefully crafted Copilot system message and you can contribute context to other participants.
For example, language extensions (such as the C++ extension) can contribute in various other ways:
- Contribute variables that bring language service smarts to the user query. For example, the C++ extension could resolve the
#cppvariable to the C++ state of the workspace. This gives the Copilot language model the right C++ context to improve the quality of Copilot answers for C++. - Contribute smart actions that use the language model, optionally in combination with traditional language service knowledge, to deliver a great user experience. For example, C++ might already offer an "extract to method" smart action that uses the language model to generate a fitting default name for the new method.
Chat extensions should explicitly ask for user consent if they are about to do a costly operation or are about to edit or delete something that can’t be undone. To have a great user experience, we discourage extensions from contributing multiple chat participants. Up to one chat participant per extension is a simple model that scales well in the UI.
Publishing your extension
Once you have created your AI extension, you can publish your extension to the Visual Studio Marketplace:
- Before publishing to the VS Marketplace we recommend that you read the Microsoft AI tools and practices guidelines. These guidelines provide best practices for the responsible development and use of AI technologies.
- By publishing to the VS Marketplace, your extension is adhering to the GitHub Copilot extensibility acceptable development and use policy.
- Update the attributes in the
package.jsonto make it easy for users to find your extension. Add "AI" and "Chat" to thecategoriesfield in yourpackage.json. - Upload to the Marketplace as described in Publishing Extension.